Six days ago, my sweet baby girl turned 2 years old!!
Oh my, how time has flown by!

Harper Joy is SUCH a little entertainer…full of life, tons of joy and LOTS of passion…both good and bad! :) She is full-blooded two years old right now in every way! But everyday gets more fun because she is learning SO incredibly fast. Her brain is flying at warp speed ahead! I love love love seeing her discover new things, learn her shapes and colors, work on puzzles, hear her pray, build legos, give kisses, show us her “cuteness shoulder”, give loves when her brother or sister get hurt. I love to hear her sing TONS of songs all day long and say “love you mama” and silly things like “pickles and meat!” – her favorite lunch request! :) Harper Joy, you have added so much to our family! Thank you for your passion, energy and hugs!! We love you more than the sun!
It was also my nephew’s birthday…the same day! They are two years apart exactly! My sister and I decided to do a simple family party for them but we needed a common theme. After kicking around lots of ideas, we settled on Elmo! :) I actually never thought I’d do an Elmo cake! – but alas…here it is! Both Jordan and Harper are into Elmo so it made for a bright and colorful party.

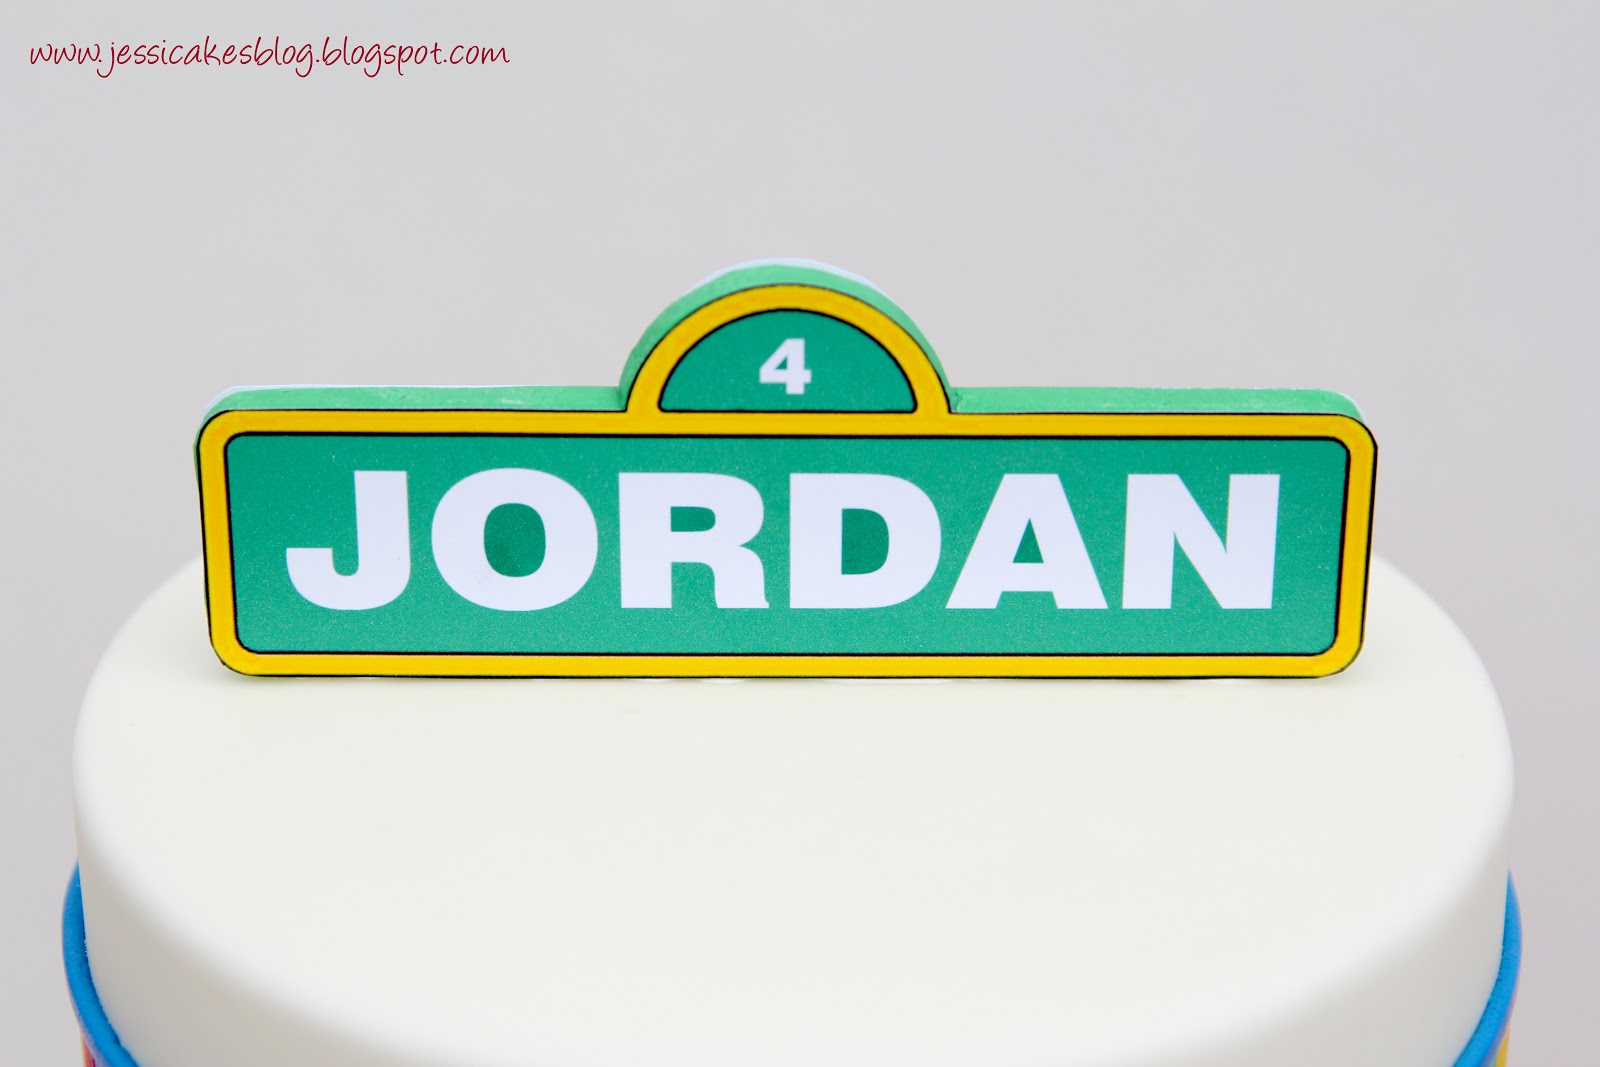
The next trick was designing the cake to be personal for both of them. So, I came up with this design where one side of the famous street sign says “Jordan” and on the other says “Harper”. What was so fun about this, was that we lit candles, sang “Happy Birthday” to Jordan, he blew out the candles, we took pictures…then, we turned the cake around, lit candles, sang “Happy Birthday” to Harper, she blew out her candles we took pictures…and Voila! – It was like we had two cakes and two parties!! It worked perfect!
The bottom tier was an 8″ round, 5″ high cake filled with vanilla cake and Butterfinger buttercream! YUM!

There were over 100 polka dots on this cake!! The polka dots were each 1″ in diameter. I originally was going to make them 5/8″, but when I started to work on it, I realized I was going to need something like 300 polka dots…so, I enlarged the pattern and cut down the quantity I needed! :) Mama had too much going on this week to do 300 polka dots! :) I created this pattern in photoshop so I knew which color would go where.

I found this Elmo image online and printed it out a few times so I could cut out the features and make templates from it. I laid all the features on a black background of modeling chocolate so there would be a shadow/line around the figure and make it stand out a bit more on the cake.


If you’d like to know how to use my wax paper transfer technique to lay out the vertical stripes and the polka dots, I show it in my new Craftsy Class. You can get more information HERE.
I had planned to make the street sign hang from a lamp post coming out from the top of the cake. How cute would that have been!!! But, again, priorities! – and for me this past week…it was being a good mommy and not spending hours in the kitchen making a lamp post and ignoring my kids!! – so, I found this image (below) online, I imported it into Photoshop and erased the “Sesame Street” and put in Harper and Jordan’s names. I then printed it on cardstock and stuck it on a thick piece of fondant I cut out to be exactly the same size as the sign. So, it’s paper! – not fondant. Again, you could totally make it from fondant…and spend the time cutting out the lettering and the yellow border, but I just didn’t have the time this week.
SO, save yourself some time and print it!


The only thing I would have done differently was to switch out that blue band on the stripes to a green. It looked fine to me until I put the street sign on there and then the blue looked out of place. It should have matched the street sign…either green or yellow. I usually always make my borders the darker color…so, without really thinking through it, I made it blue. BUT, next time…or if you make this cake…make it green! – or yellow and green to match the sign!

Last but not least…here are my sweet girls! :) My spunky two year old in front and my sweet seven year old in the back! :) OH, God has been good to me! I love love love these girls!!
Thank you Jesus!
Happy Birthday to your babies! The cake is so cute!
LOVE it! I am an adult and do not yet have kids, but this cake excites me. I am such a Sesame Street fan! You work is impeccable , as always. Belated birthday wishes to your daughter and nephew.
Brilliant! God continue to bless the work of your hands
oh!!!!! Another lovely cake, I’m sure the little ones were happy to celebrate with Elmo (and the big ones to remember him, as well!). Congratulations, as always!!!
soo cute!! Not sure I understand what you did differently when you were talking about the softened buttercream…you said you left if out for about 45 min. with a fan on it after you covered it in fondant…what do you normally do instead of this? Thanks for sharing!!!
Hi bonnie,momma!
I usually just smooth it as good as I can before it starts to condensate, then put it back in the fridge. I don’t let it sit out and soften because then it’s real hard to get the top corners sharp. I just get them as sharp as I can before it starts to condensate. But, this time, I let it sit out so it wasn’t sticky anymore, flipped it over and continued to sharpen the top edges/sides because the board under it (or on the “top”) was helping to keep it’s shape by being on the counter. Then, I only had to worry about the sides. I hope that makes sense?!
hmmm…I’ll have to read that a couple times to understand, i think i wish you lived right next door so I could just walk over and see everything- i’m such a visual person! so much for me to learn! thank you for taking the time to explain!
Hi!! The cake is so cute, congratulations!
Wow, congrats! Happy Birthday to dearie Harper Joy
What a cake! So much detail and it’s perfect in every way! Happy birthday to your little girl I DO have a few questions for you. How did you get the stripes of color all in a row nicely? The ones behind the Elmo head And what did you use to adhere the paper to the fondant? I’m working on a cake this week that I’m going to use paper due to time issues but don’t know what to use. Thank you!!
Thank you!
The row of fondant stripes was done with a fondant transfer technique I created. BUT, I can’t give that info to you right now because I’m in the midst of doing a video tutorial of that and have to keep it “hush hush”! So, stay tuned for updates on when the video will be done and out for all to see!
I put the paper on the fondant right after I cut it so the fondant wasn’t dried out and the paper stuck right to it. You could spritz the fondant with a touch of water, then wipe it off, so it’s still a little sticky, then put the paper on. You just want to make sure the moisture is pretty much gone (but the surface is sticky) so it won’t bleed into the paper.
Best wishes!
Wow. Amazing. God bless you and your family!
I am one of your followers.You have been very blessed and you generously share one of the talents that you have been given. Your cake work is always so beautiful! The tips and tricks that you learned doing each of your cakes and share with all of us , is very much apreciated. I am only a hobbyst and have lots still to learned. I thank you and wished you well in all the new and good things that may be coming your way. God bless!
So cute!! A very beautiful cake!
Hi Jessica,
Thank you for sharing your recipes and techniques. I learned a lot from you. I made your Choc Ganache recipe using Girardelli bittersweet choc chips which is 60% cocoa. I do not have a kitchen scale so I researched a lil bit and used 1 tablespoon heavy cream for 1 oz choc. I am sure I did something wrong here coz my ganache didn’t turn out well. Could you please tell me how many tsp or tbls of heavy cream should I use per ounce?
Hi Masrath!
The standard ganache recipe for a crumb coat on a cake is 2:1 ratio. So, 2oz of dark chocolate to 1oz heavy cream. OR, 2 cups dark chocolate to 1 cup heavy cream. The 1:1 ratio you used is for a pourable ganche that won’t set up on you. If you still have the ganache, warm it up slightly, melt down some new chocolate (use the same amount of chocolate you already used) and add it to the ganache and stir stir stir. You should be fine. I hope that makes sense. You didn’t ruin it…you just need to add more chocolate!
Thanks for being prompt, Jessica. I will try adding more choc next time. So is it still 2:1 (2 Choc:1 cream)if I want to use Ganache as a filling?
I made your Choc Mud Cake…yummmmmmm. Its delicious!!! Thanks for sharing the recipe. When you make your cakes, do you sift your flour into measuring cups or scoop flour with them? I am asking this question coz the flour quantity is more when scooped.
I’m glad you liked the cake…it’s my FAV!
Yes…2:1…dark chocolate to heavy cream.
I don’t sift anything. I always weigh all my ingredients so I don’t have to worry about settling.
Blessings!
Thanks Jessica. I just made your SMBC icing and its delish, turned out very well…light and fluffy like cool whip. Its sitting at the counter right now. I didn’t know 5 eggs would make so much. How do I store the left over and for how many days can I store it?
(Sorry for pestering you for every little question)
Yeah! I always store mine in the fridge for about a week (bring it back to room temp before re-whipping) and if it’s going to be longer before I need it I’ll put it in the freezer tightly sealed for several months!
Hi Jessica,
Just had a cake disaster! I finished making my first tier cake by 1:30am and woke to at 5:30am to find my cake bulged up. My fondant bulged up and I don’t know why. I was so heart broken and disappointed that I literally cried. Please help me jessica. I used the SMBC icing on both my tiers and lay fondant on cakes right from the fridge. As my icing reached room temp, it was harder to work coz the icing was way too soft. But, when I refridgerated the cake, i had condensation issues. Also, my fondant started to break as I laid it on the cake. I made 3″ high cakes before and this never happened. What can I do or not do next time. I would really appreciate your time. Thanks.
I’m so sorry for the disaster!! My heart seriously breaks when I hear that!!
Cake bulges happen when the cakes settles. So, you need to make sure before you stack/fill your cake that you’ve allowed your cake layers to settle. I do that by putting a little weight on them overnight. Remember, when you add 1.5 lbs of fondant onto a cake, it’s going to want to condense it. So, you need to make sure you’ve already done that a little in the settling process.
The buldge also might have been an air bubble. Your cake is full of air. Some cake has more than others because of their construction. Air could be in your frosting, in your cake, and trapped between the crumb coat and fondant coat. When air warms up, it expands, so a tiny little bubble when cold, becomes huge when it’s warm. The best way to cover a cake is at room temp. But if you want to achieve sharp corners and you’re using buttercream you have to cover it cold. Then, leave it out at room temp and as you see air bubbles, you insert a pin in there and pop them and push the air out. As you get better at covering cakes, you’ll get less trapped air…but it always happens when you’re cake goes from cold to warm air. That’s why I like ganache! I let my ganache cakes sit out at room temp for a while before covering them. And, I’ll leave them out as long as the filling isn’t perishable.
I hope that helps! The only thing about your fondant is that is wasn’t soft enough…it must have dried out. It shouldn’t break/crack unless it’s dried or old. Try working in some glycerin or corn syrup until it’s nice and warm and elastic…then cover your cake.
Best wishes!
Thank you for your prompt reply Jessica. I will keep these pointers in mind next time. For a moment I gave up and thought may be this isn’t my cup of coffee. But with a supportive husband and an inspiring & helpful friend like you, I am not giving up. I will keep trying and I know God is with me. Can’t find enough words to thank you for being there.
The cake was delicious though. Thanks for the Mud cake recipe again.
God bless you!
Hi Jessica,
This is just such a lovely cake! Were the dots on this cake fondant or modeling chocolate?
Half and half! I had blue and green fondant and I had red, orange and yellow candy melts which I used to make modeling chocolate with. So, a little of both!
Thank you!
Hey Jessica,
I love this cake & love your work! It looks so similar to a cake I designed, take a look! http://www.juicydesserts.com/blog/2011/10/11/elmo-cake/
WOW!!! That is so funny…it does look really similar with the stripes and the polka dots! Great minds obviously think alike. I took a look through the rest of your cakes too and they’re beautiful!! Nice work!!!
jessica hello! I bought several of your classes craftsy and love! now my question is about this elmos cake.
I want to do that for my 2 years birthday’s son this 24th.
my question is: how to calculate exactly the height of the cake? calculating the filling, fondant and cake? the issue is that I want to make ready the colored dots and cut (of modeling chocolate)? it’s posible? or I must first assemble the cake and cut the dots according to the exact size that I fell once armed cake?
You can build your cakes keeping in mind the height you need then add in another board or two under the cake board to build up your height a bit before doing your final crumb coat. I also adjust the amount of filling I use depending on how tall my cake layers are. It a puzzle, but that’s what I do. Then I space my polka dots just enough to make it all work out!
THANKS! YOU RE DIVINE!
Hi Jessica,
I fell in love with this cake and i am dying to try this for my son’s 2nd birthday. Can you also share how you did the top tier cake? I tried reading through this page few times but i am not getting any info about it.
Hope to hear from you.
Yes! I did it with my signature wax paper transfer technique. If you haven’t watched my first Craftsy class (Clean & Simple Cake Design), it is a game changer! I’d highly recommend it. You can find 50% off links on the side bar. Basically what I did was cut a lot of colored stripes out and place them on top of a greased piece of wax paper side by side (I cut the wax paper to be an inch or two bigger than the finished stripes x the circumference of my cake). Once I laid the stripes out (I made sure they were a little bit longer than I wanted them so I could re-cut them straight across) I cut them with a ruler to get a nice straight top and bottom to get the exact height stripes I wanted. I then wet the top (which is actually the back) of the stripes with a little water, then flipped it over and placed it up on my cake nice and straight (I pre-marked a line on my cake to help me line them up) and peeled off the wax paper. Sorry if that sounds confusing…but it works brilliantly! Then I extruded a rope of accent color on the top and bottom to finish it off. Have fun!!